Takeoff Speeds
by Eric Bradley, 19 December 2015

Photo:
Fisher (viewology.net)
[ccSA]
Of all the things we receive questions about, it seems takeoff speeds are the source of the most confusion, and/or misunderstandings.
It's possible I didn't give due thought to this matter in the tutorials because it was assumed that most users would be real-world Airbus pilots going through the proper training syllabus, and the emulator (and tutorials) were intended as a quick top-up / refresher, or an opportunity for free and easy practice.
As things appear to have turned out, while we do have thousands of regular visitors who are indeed Airbus pilots, or captains making the transition from Boeing, we also have many more visitors who are private pilots and simulator enthusiasts, and for those people there's a big chunk of information missing.
So for the benefit of everyone, I'm going to use this article to try and fill in the blanks. Please do contact me for information if you have any questions or if you notice any errors in the information provided here. We hope to encourage better learning and especially safety for everyone who is using our resources here.
Takeoff speeds are one of the most important things you need to understand as a pilot. Of course landing speed is even more important, but that tends to be relatively uniform, as you need to maintain enough knots to stay airborne until just before you touch down. So landing speed is a lot simpler than take off speed.
For most airline pilots, your company will provide reference charts for each airport that you work out of (at the very least), and these will have the appropriate settings for V1, V2 and VR. Simulator pilots, you have a bit more work to do, because you won't have ready access to those references (we'll try to make a database available in the future, for simulator users to have the same references, however your simulator software may not have real-world accuracy so the settings may still need some adjustment).
Minimum Speed for Control on the Ground
The first speed you have to be ready for is not even one of the 3 reference speeds.
This is the speed required to maintain minimum control on the ground, and is
predictably enough written as "VMCG". The actual velocity
does vary slightly with altitude above MSL.
Now what you need to know about VMCG is that it's main purpose is to ensure you have the ability to control the aircraft while it's still on the ground and one of your engines cuts out while you're rolling. You can probably predict what will happen in that situation, because you'll have asymmetric thrust, and quite possibly also quite strong thrust as this is more likely to happen during the actual takeoff.
When you have asymmetric thrust, the aircraft will try to move laterally, and the only way you can steer against it and keep the aircraft straight on the runway is to apply full rudder in the opposite direction. Obviously your goal initially will be to slow the aircraft from takeoff thrust (but only if you're below V1). PNF should also notify ATC that you have an emergency on the ground, so they will be ready to mobilize emergency services and delay other waiting aircraft, unless you are super-confident that you have the situation completely under control.
The yaw can be expected to happen very suddenly in this situation and you need to act very quickly. In many cases, you will go off the runway before you can react quickly enough. The worst thing that could happen is to exceed V1 while moving laterally on the ground.
Engine Failure Speed
Between VMCG and V1, we also have VEF, which
is "engine failure speed". This one is a tiny window of time, always
one second or less, during which you actually notice that you're past
VMCG and below V1 and you have an engine failure.
That's your one second to react before reaching V1. Neither
VMCG or VEF need to be called out during the takeoff roll.
Why you need to know the VEF for your aircraft is because you must ensure that V1 is higher than VEF, and the amount it must be higher by is different depending on whether the runway is wet or dry (due to decreased braking in wet conditions). Fortunately your airline's reference charts take all this into account for you.
Decision Speed
Now we come the V1. This is your "decision speed". Once
you are past this speed, you no longer really have a realistic chance to abort
the takeoff, because you won't be able to stop the aircraft on the ground
without crashing, and crashing on the ground is still very dangerous.
V1 is the first speed PNF should call, this alerts the PF that
you've reached V1.
If you have an engine failure before or exactly at V1, you can try to abort the takeoff. As the PF you will have to make a very quick decision at V1 whether you will continue the takeoff or not. As you have a single engine failure on a 2 engine aircraft, the yaw will be significant. We'll talk more about single engine takeoff in another article.
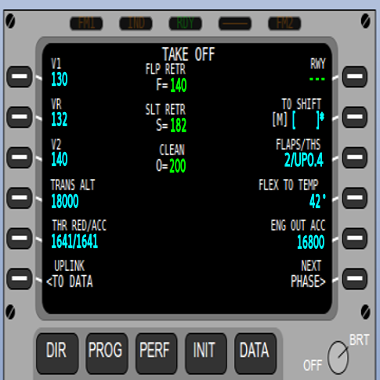
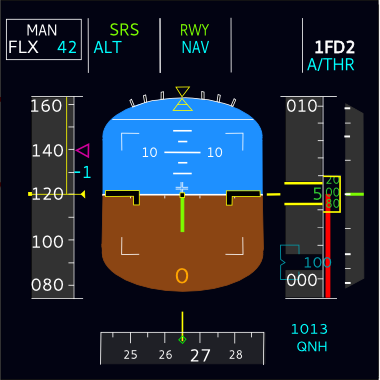
When you add V1 in the MCDU PERF page, the PFD will be updated with a "1" symbol in cyan, as in the illustration below, marking the position of V1 on the speed tape.


Drawing:
Eric Bradley
[© 2015]
Unstick Speed
There's another not-well-known speed in the mix, which is the
"maximum unstick speed", written as VMU. This is
technically a speed where you can takeoff even if you create a minor tailstrike
when pitching up. While it's not a speed you'll be particularly
interested in, here's a
video
that does a sweet job of demonstrating VMU, and if you'd like to
see how engineers determine VMU for the Airbus, here's
another
video. Watching pilots intentionally create a tailstrike may be an interesting
experience for you.
Rotation Speed
The speed which actually matters is "rotation speed", written as
VR, and this another called speed. The task for the PF is to pitch
up smoothly on reaching this speed (note, some fighter aircraft and light
high-powered aircraft don't require any physical input past V1
to become airborne).
VR is a speed where there is at least enough velocity already gained that V2 will still be attainable 35 feet from the ground, even if an engine fails during lift-off. The actual speed at 35 feet will therefore be greater than V2 because normally both engines are working when you reach that altitude.
Minimum Speed for Control in the Air
Next we come to VMCA, which as you can probably guess is the
minimum speed for control in the air. The same basic idea applies as for
VMCG, except in this case it is that you must be able to maintain a
particular heading through the air using the rudder to counter asymmetric
thrust. The VMCA is not a called speed.
Takeoff Safety Speed
Then we have "takeoff safety speed", or V2. This is the
minimum speed that needs to be maintained until you reach acceleration
altitude (so that means you can go faster than V2 but not slower).
Of course in the real world, you can only do what the plane allows, so if it
doesn't have the power to maintain V2 while climbing,
you'll have to improvise.
When you add V2 in the MCDU PERF page, the PFD will be updated with a magenta triangle, as in the illustration below, marking the position of V2 on the speed tape.


Drawing:
Eric Bradley
[© 2015]
With both engines operating normally, the usual recommendation is V2+10 or even V2+15 (this means 10 or 15 knots above V2). When there is not much power available from the engines due to failure or malfunction, you may be able to maintain V2 by reducing pitch below the optimal rate of climb. Where it gets tricky is when there are obstacles such as buildings, hills, and trees that need to be cleared. Under normal conditions, it's not difficult to do that, but with under-powered engines, a lot of weight, and bad weather conditions, you could be in for a real fight maintaining V2 with a shallow pitch and those obstacles to worry about. Not that I'm trying to scare you or anything!
Something else you should know is that although V2 is considered an "engine out" speed, if you've already reached a speed higher than V2 when an engine failure occurs, you don't need to slow down to V2. Just keep going at the higher speed as long as you can, so you don't interrupt your climb. At this point, altitude will give you time to go around or (maybe) get the failed engine started.
Engine Out vs Low Power (and what you can do)
Now, I would just like to say that in just about every reference and document
dealing with matters affecting takeoff performance you will hear this talk about
single engine operation and engine failure, but really that's not the only
kind of problem you could encounter.
For the moment we'll not get into matters dealing with damage to flight controls or the aircraft body, but even in the case of engine thrust, it can be the case that both engines are running, but one or more of them may not be operating correctly.
If both engines are running but one has a problem, you'll notice a tendency for the aircraft to yaw due to asymmetric thrust. You can fix this by using the rudder or by reducing power on the engine that is performing better. Of the two options, during takeoff it is smarter to use rudder to correct the problem, because if the under-powered engine cuts out, you may stall, and there's no guarantee that you'll be able to get the other engine back up to full power again after reducing thrust.
If both engines are under-powered, then you'll have to wing it. In some cases it will be smarter to climb in a series of shallow steps in order to maintain speed while climbing, but that may not always be possible, especially if there's a lot of terrain. You could also do a circuit while climbing, so you could request to hold at some area and circle around it (obviously you want all traffic clear of the area that you'll be doing this) doing shallow climbs until you have enough altitude to do a proper go-around. This is not normal procedure, but I am talking about an extreme situation where you are barely able to maintain V2.
A related problem to the engine-out problem—possibly we could consider it the opposite of that problem—is where the rudder is stuck in one direction. You can obviously fix this by reducing power on one engine to create asymmetric thrust in the direction opposite the undesired yaw.
IMPORTANT: You should use this site with Chrome or Chromium browser for best results because other browsers may have too many keyboard quirks that will quickly become annoying (for example, the QuickFind feature in Firefox, or the way Firefox uses the backspace key for navigation).
For most users, it will be best to switch the browser to full screen mode (F11), so that the screen won't scroll unintentionally.
REALLY IMPORTANT: This page requires a minimum viewport area of 900px wide by 600px high. It is NOT intended to be used on a smartphone or mobile phone display, but will work on tablets that meet the minimums. You will get best results with a PC running Chromium for Linux in full screen mode.
UPDATE: From August 2017 we fixed this problem slightly. It will now scale the entire screen on Android phones. Unfortunately if your phone has a very small screen, that may make it difficult to read the text.
In the lesson panel on the left side of the page, you will see it has been divided into 3 sections.
The top section shows the available lessons, displayed as a row of buttons. Each lesson is designed to follow from the previous one, so it is best to complete them in order from left to right.
The middle section is the lesson body, which contains all the content of the lesson.
If you see a green button, this means it leads to information that is essential for continuing (exception is on the preflight checks page, where color has no meaning). Blue buttons link to information that may be of interest, but is not essential.
The lesson body may need to be scrolled in order to see all of the content. It is important to remember that when moving between pages, on most browsers the scroll position will not be reset (if you know how to do that without refreshing the page, be sure to let us know). You will need to scroll back to the top yourself.
The bottom section divides the lesson body into pages, making it easy to go back and review what you have already read before.
Most of the time, you should read every page of every lesson. The exception is lesson 1: Check & Start. For that lesson, you can skip straight to page 5 if you have no interest in real-world aviation and only want to learn the MCDU procedures.
This help file is due to be updated and will be given a new separate page with much more detail.
For now, we felt it is better to just get the most vital information out there as quickly as possible, so you can started. We will make fixes as we go, and continue adding content as it becomes possible.
Our site is famous for two reasons... first and best, because of our attention to detail and our solid attempt to create the most realistic free online training tool available for the MCDU. But unfortunately we're also famous for how slowly we can make updates.
We'd like to improve on both counts! And that's where you have the opportunity to help.
This product is available to the public totally free of charge and we don't make any profit from it at all. We volunteer our spare time to work on the project and unfortunately there is less and less of this spare time available.
So we are now asking any enthusiastic volunteers who would like to see this project reach its full potential to assist with developing the project. It is really easy to help and you don't need to be a programmer to do it!
You can help us by adding new airports, waypoints, routes etc. If you can spare just one hour to help with that, even if you only add one line of data, it will go a long way towards getting this project up in the air :)
Everyone who helps will get a shiny new developer credit that you can display on your CV or brag about to your friends or whatever else you want to do with it.
Please use the email contact form to get in touch if you are interested. Also any active duty or trainee A320/A330 pilots (or similar) who would like to help in other ways than adding data, we are also very keen to talk with you!
My sincere thanks to everyone who has helped us to keep this project alive for another year, and I truly hope we can continue to make things even better.
xmodmap -e "pointer = 1 25 3 4 5 6 7 8 9"
When we first started this project, many airlines were still using the older MCDU hardware with just software updates, so many of them had a simple OFF/BRT knob that you rotated to adjust the brightness or turn the unit off. That is no longer the case and it is much more common to encounter the newer hardware, so we have implemented a long overdue update to the interface. Now you use the BRT and DIM keys to switch on and off. We have not added incremental brightness yet, but it is planned for the near future.
New
FANS
/ ATC COMM tutorial available!
Additional information is available from
document
or visit
IBAC website).
For now, it works in a much simplified manner. Tough break, but we need more money!
Fixed PERF CLB / CRZ / DES pages.
Built framework for PERF APPR page, but it does
not display yet (needs a little coding, thanks for
your patience and understanding).
Now also working on some new LATREV functionality.
Added section to website to allow you to
participate in developing this project.
For the moment, because I don't yet have any other place to bring this notice to attention, regarding the soon-to-be-implemented communications features, I would like to present this document containing potentially important information regarding the nature of communications messages and some of the matters that you should be aware of. Eventually we will get around to providing a tutorial on all this stuff here on the MCDU website. The features will be available before the tutorial is ready, so that is why I have made the link to the document, which is not a tutorial but does raise some important issues that will undoubtedly be of help to you in your training.